I have been teaching Vista courses for about 6 months now and the one question I always get is "Should I upgrade now or wait until Microsoft releases the first service pack?". My answer is always the same. "It really depends on your current infrastructure and applications that you are using in your workplace or home". The second most common question I get is "Can you tell me some quick Vista tips and tricks?". This is an easier question to answer so I figured I would list my 10 Vista Tips to improve your user experience with the new OS. Since the majority of my students are business users then I will be focusing on features that are included in the Business, Enterprise, and Ultimate versions.
Tip 1: Copying Links
Microsoft has provided us with a way to copy the UNC path to a file or folder by using a combination of the Shift Key and the Right Mouse Button. If you hold down shift and right click on an item you will see a new option in the menu "Copy as Path".
When click it will copy the UNC path to the clip board. This can be very handy if you need to IM or email a link to a network shared file or folder.
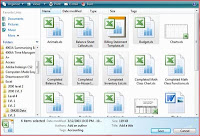
Tip 2: Tag Your Files
Without a doubt my favorite new feature in Vista is the new desktop search feature. To get the most out of search, Vista allows us to add meta data to files thus tagging them with terms that we would search for during normal computer use. Files can be tagged a couple of ways. One way is to simply select the file and add the tag word in the tags box in the the properties section of explorer.
Tip 3: Disable the UAC
The UAC (User Account Control) has been the butt of many jokes since its inception but it does serve a good purpose. Basically, the UAC forces everyone (even administrators) to operate with the standard user permissions. If you need to do anything that requires administrator permission then you must grant these permissions by supplying the administrators token. Now, if you are logged in as someone with administrator privileges then you simply click the continue button when the UAC prompts for your consent. If you are logged on as a standard user then you will be forced to supply an administrators username and password. The problem is many people are getting annoyed with the UAC so here are a few ways to disable the feature.
First, you can simply go into the users setting in the control panel and disable the UAC by clicking the bottom link on the users page.
If you want to really take control of the UAC then you will need to edit the security policy. By doing this you can control things such as leaving the UAC on but forcing anyone with administrator credentials to always run in admin approval mode. This basically disables the UAC for administrators but leaves it on for everyone else. There are many more settings you can control with the security policy so open up your MMC and take a look.
 Tip 4: Turn on Bitlocker without a TPM chip
By far one of the biggest reasons to upgrade to Vista is the new Bitlocker feature. Bitlocker was designed for laptops but it can be used on both laptops and desktops. Prior to Vista we could only encrypt individual files and folders (unless we used a secondary product) but Bitlocker allows us to encrypt an entire drive. One of the hardware requirements to enable Bitlocker on your machine is a TPM chip must be included on the motherboard. A TPM chip is a special microchip in some newer computers that supports advanced security features. If your computer was manufactured with TPM version 1.2 or higher, BitLocker will store its key in the TPM.
Like most users, you may want to use Bitlocker but your computer does not have A TPM chip. Fortunately there is a work around for this issue. If you have a USB Flash drive then you can make a Group Policy change that will allow you to use the Flash drive in place of the TPM chip.
Open up the Management Console and go to the Bitlocker section in the Administrative templates and enable advanced start up options.

Now you will be able to turn on Bitlocker and use the Flash drive to store the key. Keep in mind that you will always need the Flash drive to get back into Vista.
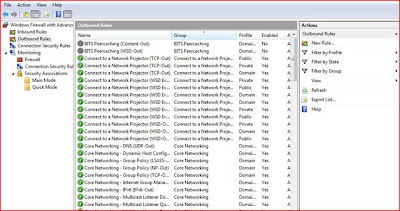
Tip 5: Take Control of the New Firewall
In XP SP2 Microsoft released a built in firewall to help protect users from intruders. One of the knocks on this firewall was it only blocked incoming attacks. With Vista, Microsoft has improved the built in firewall and by using the new Windows Firewall with Advanced Security snap in you can now block outgoing transmission. To get to the new settings simply type "Firewall" in the search and select Windows Firewall with Advanced Security. The new firewall is integrated with IPSEC so it can be a little complicated but take a look at the new features and take control of your security.


No comments:
Post a Comment